
Solo-Cap™ Needle Recappers | Needle Recapping Devices
The Solo-Cap needle recapper, also known as a needle recapping device, is the safest, simplest, and most effective method available for unsheathing and recapping needles using one hand!
- One-handed operation conforms to current OSHA regulations.
- Machined from plastic resin or finest quality stainless steel.
- Tapered internal threads secure and release any size dental or medical needle with only a slight twist.
- Syringe supported in a convenient and safe position for reinjection.
- Flow-through design enables spray disinfection.
- Compact size allows for unobtrusive mounting (1″ x 1.5″).
- Click here for directions on installation and use
Two unique designs of Solo-Cap™ needle recappers:
Plastic Solo-Cap Needle Recapper (model #1014)
Plastic recapper is secured with adhesive backing to any flat surface. The flow-through design encourages spray disinfection.
Where to order the plastic Solo-Cap Needle Recapper:
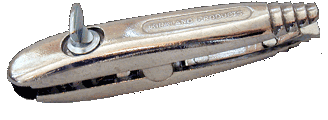
Solo-Cap II™ Needle Recapping Device (model #1013)
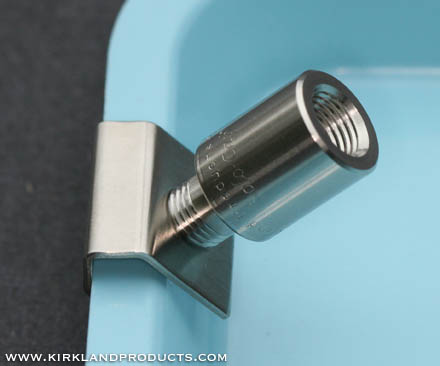
Solo-Cap II™ Needle Recapper is made from stainless steel and mounts quickly and securely on plastic set-up trays. It occupies no set-up tray space and is easily detachable for routine disinfection or sterilization.
Where to order the Solo-Cap II Needle Recapper:
Directions for Installation and Use
Plastic Solo-Cap Needle Recapper (model #1014) Note: stainless steel base is no longer available.
Select an area that is flat and relatively smooth for installing recapper. Recapper should be positioned where syringe cannot be bumped inadvertently. Clean and dry the area. Remove protective tape backing and press base firmly onto selected area for about 30 seconds.
Attach needle with cover onto syringe but do not tighten excessively due to risk of stripping plastic needle threads. Firmly insert attached needle cover into opening of recapper and twist clockwise approximately one turn. Remove syringe with needle from secured needle cover by pulling away from device. Syringe with needle can be stored in device for subsequent use by inserting syringe with needle straight into needle cover. To remove, twist syringe with cover one or more turns counterclockwise and pull syringe with attached cover out of recapper. Covered needle can now be removed from syringe and disposed of safely. Flow-through design of needle recapper encourages spray disinfection.
Solo-Cap II™ Needle Recapper (model #1013)
To attach Solo-Cap II™ Needle Recapper to plastic set-up tray, first twist threaded cylinder counterclockwise to full extent. Note: to simplify installation and removal, the recapper has been designed so that the cylinder will not separate from the clip. Attach clip portion over edge of tray completely and twist cylinder clockwise firmly. To remove device from tray for autoclaving or repositioning, twist cylinder counterclockwise to full extent and slip recapper off of edge.
Attach needle with cover onto syringe but do not tighten excessively due to risk of stripping plastic needle threads. Firmly insert attached needle cover into opening of recapper and twist clockwise approximately one turn. Remove syringe with needle from secured needle cover by pulling away from device. Syringe with needle can be stored in device for subsequent use by inserting syringe with needle straight into needle cover. To remove, twist syringe with cover one or more turns counterclockwise and pull syringe with attached cover out of recapper. Covered needle can now be removed from syringe and disposed of safely. Recapper can be removed from tray for routine disinfection or sterilization.